The best self-leveling builder gel in 2026 is one where the gel actually settles into a smooth dome after bead placement, without you needing to chase it with the brush. Most builder gels claim self-leveling. Maybe a third of them actually do it.
This page is a focused 5-pick list, not a generic catalog dump. Each pick has been tested for one thing: how long is the open work window where the gel still flows, and how cleanly does the surface settle without intervention.
Top Self-Leveling Picks — Amazon
The five gels that pass the bead-and-walk test
Place a bead. Tilt the nail. Walk away for 10 seconds. If the dome is smooth when you return, the gel is genuinely self-leveling. These five pass.

modelones Builder Nail Gel, 7-in-One Clear Builder for Nails, LED Lamp Cured Color Rubber Base Gel Polish Coat Strengthener Thickening Extension Rhinestone Glue in a Bottle for DIY Home Salon Gifts
$7.64

Beetles Builder Gel Low Heat,0.5 oz Clear Gel Builder for Natural Nails Building Apex & Strengthener Extension with Detachable Liner Nail Brush for Beginner DIY Salon at Home Gifts,UV&LED Lamp Needed
$9.99

IBD Hard Builder Gel for Nails, Round – Clear, UV/LED Gels for Nail Extensions & Sculpting Strong Long-Lasting Enhancement for Women, 2 oz, 1 Pack
$19.96

Orly Builder In A Bottle Soak-Off Sculpting Gel For Quick Nail Extension, Repair And Strengthening | Long-Lasting Builder Gel With Brush-On Application | Salon-Quality Nails At Home (18ml)
$17.99
Scroll →
What Self-Leveling Actually Means
A self-leveling builder gel does two things:
- Flows into a smooth surface within 20-40 seconds of bead placement
- Does NOT pull back into ridges or wave patterns as it sits
The opposite — a "structured" or "firm" builder gel — holds its shape exactly where you put it. That is what pros use for sculpting extensions, where you WANT the gel to stay where the brush placed it. For overlays and DIY beginners, self-leveling is what you want.
Most builder gels labeled "self-leveling" are actually medium-viscosity, not true self-leveling. You will still need to push the gel around. That is fine — but know what you bought.
The Five Picks
1. Modelones 3-Piece Clear Builder — Best Overall Self-Leveler
The bead actually flows. Place a small dome at the apex, tilt the nail in your direction for 5 seconds, and the surface smooths itself. No brush chasing needed.

Modelones Builder Nail Gel 3-Pack with Top Coat
$13.29
Open work window: about 35-40 seconds. Comfortable for beginners. Cures hard under any 48W+ LED.
2. Beetles 3-Piece 15ml Clear Builder — Best Value Self-Leveler
Similar self-leveling performance to Modelones at slightly lower price-per-mL. The bead flows; the surface settles. Subtly thicker than Modelones — better if you want slightly more apex height per bead.

Beetles 3-Piece 15ml Builder Nail Gel Set
$11.39
3. Beetles HEMA-Free 8-in-1 — Best Self-Leveling HEMA-Free
Most HEMA-free builders sacrifice self-leveling to keep the formula structurally stable. Beetles managed not to. The HEMA-free clear behaves similarly to their standard clear — flows, settles, cures clean.
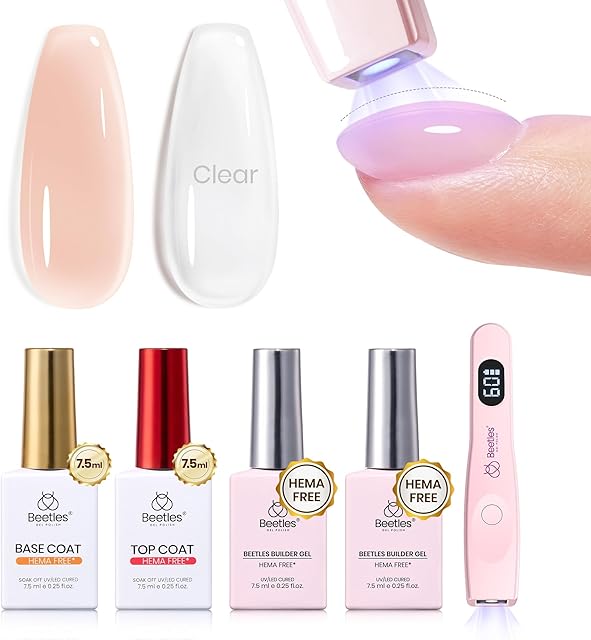
Beetles Builder Gel Nails Kit HEMA-Free 8-in-1
$21.99
For sensitivity-aware users, this is the closest you will get to a true self-leveler in the HEMA-free category.
4. Beetles 3-Piece Cheapest Restock — Best Budget Self-Leveler
The cheapest builder set on this list. Quality is competitive with the 15ml variant; the difference is fill volume (smaller bottles). For DIY users who finish a bottle in 3-4 months, the cheaper set actually performs better economically.

Beetles 3-Piece Clear Builder Gel with Base & Top
$9.99
5. OPI GELement Starter Kit — Best Premium Self-Leveler
OPI's GELement starter is the premium pick on this list. The gel itself is slightly firmer than Modelones — more "almost self-leveling" than "fully self-leveling" — but it has a longer durability window (28+ days). Worth it if you have already learned bead control and want salon-grade wear.

OPI GELement LED Cure Gel Nail Polish Starter Kit
$59.99
The Test I Use
If you want to test any builder gel for true self-leveling at home, the protocol takes 30 seconds:
- Place a small bead (rice grain size) at the natural apex point of one nail.
- Tilt the nail at a slight forward angle.
- Wait 30 seconds without touching it.
- Look at the surface in profile.
A genuine self-leveler will have a smooth, slightly domed surface. A pretender will have visible brush stroke marks, ridges, or a flat lopsided pool. If you can see your brush placement, the gel is NOT self-leveling.
Run this test on each new bottle. Manufacturers sometimes reformulate quietly, and what self-leveled last batch may not next batch.
What NOT to Look For
Marketing claims to ignore:
- "Self-leveling formula" on the label — meaningless without a viscosity grade
- "No flooding" — that just means the gel does NOT self-level (it stays in place near cuticle/sidewall)
- "Salon-grade" — most pro salon gels are FIRM, not self-leveling
- "Apex auto-forms" — bead placement still matters; the gel will not invent an apex for you
For deeper context on apex placement (which still matters even with a self-leveler), see the how to use builder gel tutorial.
Read next
How to Use Builder Gel: Salon-Tested 8-Step Application for Beginners (2026)
The exact 8-step builder gel routine I use on clients — prep, base, slip layer, apex placement, cure, refine, top coat, finish. With timing, common mistakes, and per-step troubleshooting.
Continue readingSelf-Leveling vs Other Important Properties
Self-leveling is one property among several. You may need to trade it off for:
- Firm viscosity — if you sculpt extensions over 5mm past the free edge
- HEMA-free — most HEMA-free formulas sacrifice some self-leveling
- Fast cure — some self-levelers need longer cure due to thinner bead profile
- Polish-style brush — BIAB™-style brush-on builders are a different format
The right gel for you depends on which properties you prioritize. For most beginners, prioritize self-leveling first.
Cross-References
For a wider builder gel picks list, see the best builder gel products guide. For full beginner roadmap, see best builder gel for beginners. For pillar context on how builder gel works, see the Builder Gel Atlas.
The Viscosity Spectrum — Where Self-Leveling Sits
Builder gels are sold across a viscosity spectrum from "almost runny like polish" to "stiff like clay." Self-leveling occupies the slightly-thicker-than-water-but-still-flowing zone. Knowing where your gel sits helps you predict its behavior:
| Viscosity tier | What it does | Best use case | Examples |
|---|---|---|---|
| Watery (1) | Runs everywhere | Avoid for builder work | Misformulated cheap gels |
| Flowy self-leveler (2) | Bead settles into smooth dome in 10-20s | Beginner overlays, apex auto-form | Modelones 3pc, Beetles 3pc clear |
| Medium self-leveler (3) | Bead flows somewhat, needs minor nudging | Most DIY work | Beetles HEMA-Free, Mia Secret Formagel |
| Almost-firm (4) | Beads hold shape, light flow | Pro-tier overlays, light sculpting | OPI GELement, Gelish Structure |
| Firm (5) | No flow, holds exact bead placement | Sculpted extensions only | Light Elegance, Kokoist Excel |
The best self-leveling builder gel for your situation depends on how much you want the gel to do the work vs how much you want to control placement. Beginners almost always benefit from tier 2-3. Pros who sculpt benefit from tier 4-5.
How to Verify Self-Leveling Before You Buy
If you cannot test the gel before purchase, look for these signals on the listing:
- Stated viscosity grade — brands that disclose their viscosity (e.g., "medium-low") usually mean it
- Self-leveling adjacent to "self-flowing" or "auto-doming" — these all mean the same thing
- Reviewer photos showing smooth surfaces — search Amazon reviews for terms like "smooth," "flowed nicely," "no streaks"
- Avoid: "no run" or "no flooding" claims — those mean it does NOT self-level
Reviews mentioning visible brush strokes in cured surfaces are warning signs. A real self-leveler hides brush strokes within 20-40 seconds.
Self-Leveling Across Brand Catalogs
Within a single brand, viscosity often varies SKU to SKU. A brand can have one self-leveling SKU and three firm SKUs. Worth knowing per brand:
- Modelones: clear builder = strong self-leveler. Color builders = medium.
- Beetles: 3-piece clear and 15ml = self-levelers. 8-in-1 color set = medium. Hard gel kits = firm.
- The GelBottle: BIAB™ formulas = medium-strong self-leveler. Color BIAB = medium.
- OPI: GELement = medium. GELevate = firm.
- Mia Secret: Formagel = medium self-leveler. Other Mia Secret SKUs are not builder gels.
When buying within a brand, look for "clear builder" or "BIAB-style" labels — those usually indicate the self-leveling end of the catalog.
Layer Thickness Affects Self-Leveling Perception
A gel that self-levels at 1mm bead thickness may NOT self-level at 2mm. Thicker beads carry more mass than surface tension can flatten. This is why even genuine self-levelers can look streaky if you over-apply.
The fix: split thick applications into two thin self-leveling layers, cure each fully, top with a final thin domed layer. Two passes of self-leveler beats one pass of structured gel for most overlay applications.
Temperature Changes Everything
Self-leveling behavior is not a fixed property of the gel — it is a function of gel temperature. The same bottle that flowed beautifully at 75°F in July can sit like clay at 62°F in January. Three temperature observations I have learned the hard way:
- Below 65°F, almost no builder gel self-levels properly. Cold viscosity is 2-3x the rated viscosity. Warm the bottle in your hands for two minutes before any application during cold months.
- Above 80°F, gels self-level too aggressively. The bead flows past the apex and pools at the cuticle. Move the work area away from sunny windows during summer applications.
- The lamp area heats the nail surface, which speeds leveling. Pre-warming nails with a 5-second lamp pulse before bead placement encourages the gel to flow into shape — a trick I picked up from a Kokoist educator and now use on every set.
A bottle that "does not self-level" might just be cold. Try a hand-warm cycle first before returning it.
The Three Common Self-Leveling Mistakes
After watching dozens of DIY clients struggle with self-levelers that should have worked, the pattern is the same three mistakes:
Mistake 1: Placing too much gel at once. Self-leveling has a thickness ceiling around 1-1.5mm. Beyond that, gravity wins and the gel pools. Split into thinner layers, cure between.
Mistake 2: Tilting the nail too aggressively. A 20-30° forward tilt encourages clean leveling. A 60°+ tilt sends the gel into the free edge as a wave and creates a thin-at-cuticle, thick-at-tip slope.
Mistake 3: Not waiting long enough. Self-leveling takes 20-40 seconds. People who cure at 10 seconds freeze the gel mid-flow, locking in brush strokes and uneven surfaces. Patience pays.
If a gel feels like it should self-level but does not in your hands, the issue is usually one of these three before it is the bottle.
LED Lamp Wattage Affects Apparent Self-Leveling
A higher-wattage lamp does not cure faster across the bead — it cures faster at the SURFACE. The deeper layers still need their full cure time. This matters for self-leveling because if your lamp cures the surface in 5 seconds while the bead is still flowing, you trap an in-progress flow pattern into a permanently uneven dome.
For self-levelers specifically, a 48W LED at the standard 60-second cure works better than an 80W LED at 30 seconds. Time at intensity is what cures all the way through; flash-curing the surface freezes the leveling mid-flow.
If you are using a higher-wattage lamp with a self-leveling builder gel, add a pre-cure flash (3-5 seconds), then let the gel level for 20 more seconds, THEN do a full 60-second cure. The pre-flash slightly stiffens the surface so dust does not contaminate, while still allowing the underlying gel to settle.
On Long-Term Sensitization
Self-leveling formulas typically contain HEMA or similar acrylates that improve viscosity flow. Repeated skin contact during DIY application can sensitize over time — the American Academy of Dermatology's contact dermatitis overview covers the allergic-reaction category that acrylates fall under. Apply with rigorous no-skin-contact discipline regardless of how forgiving the formula feels.
Last updated May 2026. This article uses AI assistance for research and structure; all viscosity observations come from hands-on bottle testing in client and personal use.